Getting Started · Setup
Creating Your First DSMapStudio Project
Creating Your First DSMapStudio Project
You launched DSMapStudio, clicked New Project, pointed it at your Steam game folder — and the Param Editor opened completely empty. The single most common first-project failure, with two causes: DSMapStudio reads UXM-unpacked files, not the packed Steam install, and the Game Type you pick must match the directory you selected. Get either wrong and the project loads with no params, no maps, and no error message.
A project isn't your game and isn't your mod folder — it's a workspace that reads your unpacked game as a read-only baseline and writes edits to a separate output, so nothing touches the original game.
Three folders, don't confuse them
- Game Directory — your installed, unpacked game files. Read as the read-only vanilla baseline; never written to.
- Project Directory — an empty folder you create for this mod; project metadata plus your edited files in a
modsubfolder. - Mod load folder — where ModEngine2 actually loads from at runtime, pointed at by its config (often the project's
modoutput).
Because edits land in the project and never overwrite the game directory, the workflow is non-destructive — your unpacked game stays a clean baseline you reuse for every project. That matters later: merging mods only works when every project shares one identical vanilla foundation.
Unpack your game first
DSMapStudio expects loose, unpacked files. Steam ships FromSoftware games as packed archives (.bdt/.bhd), and pointing at the packed install is the number-one reason the Param Editor comes up empty. Unpack before creating the project.
For Elden Ring, Dark Souls 3, Dark Souls Remastered, Dark Souls 2 SOTFS, Sekiro, and AC6, use UXM Selective Unpack — and the part beginners miss, use Selective to extract only what you need rather than the whole multi-gigabyte game:
- Param/text work (most users): mainly
regulation.bin(in the game root) plus themsgfolder for text. - Map Editor work: also
map,asset(oraet), andchr. - AC6 params specifically: just
msgalongside the rootregulation.binis enough.
Point the unpack at the real game folder, then point DSMapStudio at the unpacked result. Two exceptions: Dark Souls: PTDE predates UXM and unpacks with UDSFM instead; and the two console-only titles below ship no Steam files at all.
Reuse one unpacked baseline per game
Unpack each game once and keep it. The unpacked folder is your permanent vanilla baseline, and every project for that game should point at the same files — not just to save time, but as a correctness requirement. When you merge two mods' regulation.bin changes, DSMapStudio compares each against the baseline to work out which rows changed; if Mod A was built on one unpacked copy and Mod B on a slightly different one (say you re-unpacked after a patch), the row IDs no longer line up and the merge crashes. Pick one unpacked copy per game version, treat it as read-only, reuse it. A patch updates the game? Unpack a fresh baseline for that version and rebuild mods against it rather than mixing old and new. This is also what makes the Modified filter accurate — "vanilla" is defined by the baseline you loaded.
Create the project
With the game unpacked, New Project. Three fields and one dropdown:
Game Type — set it to the exact game (Elden Ring, Dark Souls III, Armored Core VI…). This controls which param definitions (Paramdex) load to interpret regulation.bin. The classic mistake: the dropdown keeps whatever you picked last, so a leftover Dark Souls 3 selection while you point at Elden Ring files makes every value read as garbage even though nothing errors. Set it deliberately every time.
Game Directory — your unpacked game folder (the one with the executable and unpacked param, map, msg). Not the packed Steam folder, not your ModEngine2 mod folder. Exact path per game below.
Name + Project Directory — name it, then point Project Directory at a fresh empty folder (e.g. C:\Modding\Projects\MyEldenRingMod\). Edited output lands here, game directory untouched. Create, and the editor tabs populate.
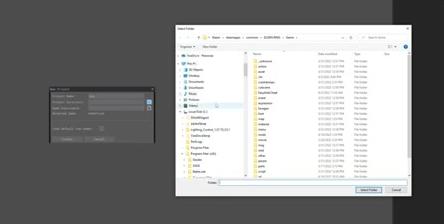
New Project — the Game Directory pointed at the UXM-unpacked game folder, not the packed Steam install. Frame from Scrub Milk's setup tutorial.
Game directory paths for every game
The directory differs per title, and several aren't where people expect (Steam library drive may differ):
| Game | Game Directory (Steam default) | Executable | Unpack tool |
|---|---|---|---|
| Elden Ring | steamapps\common\ELDEN RING\Game\ | eldenring.exe | UXM Selective Unpack |
| Dark Souls 3 | steamapps\common\DARK SOULS III\Game\ | DarkSoulsIII.exe | UXM Selective Unpack |
| Dark Souls: Remastered | steamapps\common\DARK SOULS REMASTERED\ | DarkSoulsRemastered.exe | UXM Selective Unpack |
| Dark Souls: PTDE | steamapps\common\Dark Souls Prepare to Die Edition\DATA\ | DARKSOULS.exe | UDSFM (not UXM) |
| Dark Souls 2: SOTFS | steamapps\common\Dark Souls II Scholar of the First Sin\Game\ | DarkSoulsII.exe | UXM Selective Unpack |
| Sekiro | steamapps\common\Sekiro\ | sekiro.exe | UXM Selective Unpack |
| Armored Core 6 | steamapps\common\ARMORED CORE VI FIRES OF RUBICON\Game\ | armoredcore6.exe | UXM Selective Unpack |
| Bloodborne | Extracted PS4 dump (dvdroot_ps4\) | — (console title) | PS4 file extraction |
| Demon's Souls | Extracted PS3 dump | — (console title) | Console file extraction |
Bloodborne and Demon's Souls have no Steam directory — both console-exclusive. You point DSMapStudio at files extracted from a legally-dumped console copy, not a PC install; expect a more involved extraction than the UXM one-click flow.
Verify it loaded
Don't assume it's good because it created without error — confirm. Open the Param Editor. A correctly loaded Elden Ring project shows a long list of tables down the left (EquipParamWeapon, ItemLotParam, ShopLineupParam, hundreds more). Open EquipParamWeapon and check rows have sensible names and values. Two checks catch the common mistakes: an empty table list → packed files or wrong folder (re-check against the table); present list but garbage values → Game Type doesn't match (recreate with the right game).
Opening a mod's existing regulation.bin
A project doesn't have to start vanilla. To inspect or extend a downloaded mod that ships its own regulation.bin, create the project against your unpacked game as normal, then place the mod's regulation.bin into the project's mod folder (or replace mod\regulation.bin). DSMapStudio reads the modded file as your editable layer while using the unpacked game as the comparison baseline — which is what makes the Modified filter so useful here: typing modified reveals exactly which rows that mod changed, even with no documentation. It's the starting point for understanding an unfamiliar mod and the foundation of the merge workflow. One rule carries over: the mod's regulation.bin and your unpacked game must be the same version, or the rows won't align.
Common setup errors
| Symptom | Cause | Fix |
|---|---|---|
| Param Editor opens with no tables | Game Directory points at packed Steam files | Unpack with UXM first, point at the unpacked folder |
| Tables load but values are garbage | Game Type doesn't match | Recreate with the correct Game Type |
| "Unknown DCX format" on load | regulation.bin from a patch this version can't read | Unknown DCX format; ER 1.12+ → Smithbox |
| Some folders missing in the editor | Selective Unpack skipped folders you need | Re-run UXM, unpack map, chr, asset, msg |
| Edits don't appear in-game | ModEngine2 not pointed at the mod output | Point its config at the project's mod folder |
| DS1 PTDE won't load | Unpacked with UXM instead of UDSFM | Re-unpack PTDE with UDSFM |
Project created and verified against a clean baseline. From here: the Param Editor hub for the editing workflow, or merging regulation.bin to combine mods. Haven't set up the tool itself? Start with installation.
Watch it in action
Community video guides this article draws on — credit to their creators.